


⚠️ Future Development ⚠️
Except for bug fixes and minor tweaks, this will likely be the last major release of the UniFlex —Legacy line. The default workflows include a lot of tools that might still be useful when working with older models (e.g., Flux.1 Dev), but have largely become obsolete now.
The next major version of UniFlex will likely have Krea 2 as the centerpiece, with additional variants of Anima, Bernini-R (image edit), Boogu, Flux.2 Klein, Ideogram 4, Krea 2 Edit (pending release), Qwen-Image, and Z-Image.
Introduction
💪 This workflow suite provides a unified flexible and extensible framework in the following default variants:
Flux.1 (.2)
Support and instructions for Flux.1 models (e.g., Krea), including Flux Tools, and Flux.2 Dev and Klein.
Qwen-Image (Edit)
Support and instructions for Qwen-Image and Qwen-Image Edit.
SDXL
Support and instructions for SDXL and popular finetunes, such as Illustrious, NoobAI, and Pony; along with SD 1.5 and SD 3.5.
Others *
Support and instructions for Anima, ChronoEdit [finetune of Wan 2.1 I2V]; HiDream; Kandinsky 5 Image Lite; Magic-Wan-Image v2 [finetune of Wan2.2-T2V-14B]; OmniGen2 (native); Wan 2.2 [text-to-image]; and Z-image.
[* = may have limited functionality, such as ControlNets; reference the included models & recipes workflow for implementation instructions]
Many customizable pathways are possible to create particular recipes 🥣 from the available components, without unnecessary obfuscation (e.g., noodle convolution, stacking nodes over others, etc.) and arguably capable of rendering results of similar quality to more complicated specialized workflows.
The workflow was developed and tested on the following system:
Operating system: Linux Mint 22.3 Cinnamon with 124 GB RAM
Processor: 11th Gen Intel© Core™ i9-11900 @ 2.50GHz × 8
Graphics card: NVIDIA GeForce RTX 3060 with 12 GB VRAM
Browser: Google Chrome
Please report bugs 🪲 or errors 🚫, as well as successes 🤞 and requests/suggestions 📝. Post and share your SFW creations!!! I spent a lot of time working on this project (((for no 💰))), so I hope others make good use of it and find it helpful.
Components *
Background Removal:
RMBG, BiRefNet, and SAM/SAM2/SAM3 segmentation
Captioning & Prompt Engineering:
Wildcards (Easy-Use)
ControlNets & Detailing:
Qwen-Image ControlNets: DiffSynth Depth, InstantX Inpainting, etc.
Z-Image ControlNets: Alibaba Fun ControlNet Union 2.1
LLMs for Text & Vision:
Upscaling:
Basic model-based
PiD, SeedVR2, SUPIR, and Ultimate SD
(VAE upscaling available in the spices workflow)
XY Plots:
XY plots (OutputLists Combiner)
[* = stripped down Core 🦴 editions are also included in download package]
What's New?
[10.0] Refreshed the workflow. Many custom nodes were switched out with native nodes, reducing the number of custom node packages to about 24 (or about 8 for the core edition).
Known Issues
[10.0] 🛑 NOT DESIGNED FOR NODES 2.0 🛑
[10.0] Several argument flags are known to have incompatibilities with many models and configurations, so start ComfyUI without them when testing things out. These are known to have been problematic for me: --fast, --force-channels-last, --fp8_e4m3fn-unet, and --use-sage-attention.
Quick Start
Install or update ComfyUI to the very latest version. Follow your favorite YouTube installation video, if needed.
Check that ComfyUI Manager is available, as it is now integrated into ComfyUI by default.
Download the following models or equivalents:
Flux.1: Follow the Quickstart Guide to Flux.1, if needed.
Qwen-Image: Follow the ComfyUI Qwen-Image Tutorial, if needed.
SDXL: Follow the SDXL 1.0 Overview (possibly slightly outdated), if needed.
SDXL VAE —optional
Open one of the workflows in ComfyUI. You may want to start with a pared down Core 🦴 edition.
Use the Manager to Install Missing Custom Nodes:
Fresh installation: It is recommended to install just a few custom node packages at a time until you get through all of them. You may need to set security_level = normal- (notice the dash/minus!) in the config.ini file to download some custom nodes.
Updating from a previous workflow version: It is good practice to first backup your Python virtual environment configuration, such as with conda env export > environment.yml. Custom node requirements are likely to have changed significantly, so disable all custom node packages, except for Manager itself. Then, re-enable or install missing custom nodes as required.
Tip to avoid downloading unneeded packages: Delete any unconnected nodes and/or accessory groups (20's, 30's, or 99 groups) showing as missing if you know you won't need their functions.
Restart ComfyUI.
Follow the Flux.1, Qwen-Image, or SDXL default recipe 🥣 according to your folder structure and resources.
Run the default text-to-image recipe 🥣.
Enjoy your generated image creations! 😎
BONUS TIP: Drag-and-drop your rendered image back onto the ComfyUI canvas to make any additional workflow revisions. This ensures you will always have a good default workflow as fallback. 🏅
Additional Recommended Installations
For the intended component functionalities using Flux.1, install Flux.1 Tools: Fill, Canny & Depth, Redux, and/or KONTEXT. The Redux model also requires sigclip_vision_384.
For the intended component functionalities using Qwen-Image, install the DiffSynth, InstantX Union, InstantX Inpainting, and/or various Bitwise ControlNet models.
Other ControlNets, such as X-Lab's Canny and Depth, Shakker-Labs's Union Pro, TheMistoAI's Lineart/Sketch, and/or jasperai's Upscaler and other models, are also (theoretically) supported, although results may vary. (The bdsqlsz and kohya models appear to require image dimensions be divisible by 32, which is not guaranteed in the workflow.) Feel free to browse for others.
While you should be prompted to install the necessary custom node packages (~24) via the ComfyUI Manager, I'm listing them here for your reference: controlnet_aux (Fannovel16), cyberdelia-metadata (cyberdeliaAI)*, Depth Estimation (Limbicnation), Detail-Daemon (Jonseed)*, DyPE (wildminder), EasyRegion(EnragedAntelope), Easy-Use (yolain)*, Eses Image Compare (quasiblob)*, Impact Pack (Dr.Lt.Data)*, Inpaint-CropAndStitch (lquesada), JoyCaption (1038lab), Joy Caption 2 (Pixelailabs), KJNodes (Kijai)*, LanPaint (scraed), NDDG Great Nodes (NeoDroleDeGueule), Nvidia_RTX_Nodes (Comfy-Org), OutputLists Combiner(geroldmeisinger), rgthree-comfy (rgthree)*, RMBG (AILab), sd-perturbed-attention (Pamparamm)*, SeedVR2_VideoUpscaler (numz), SUPIR (Kijai), UltimateSDUpscale (ssit), and WD14-Tagger (pythongosssss). [* = Core 🦴 edition]
Additional packages in the spices workflow: AFFINE (WASasquatch), Capitan Conditioning Enhancer (capitan01R), CapitanFlowMatch (capitan01R), comfy-plasma (Jordach), ControlAltAI_Nodes (ControlAltAI), Flux2Klein-Enhancer (capitan01R), GGUF (city96), Image-Filters (spacepxl), LatentDetailer (SparknightLLC), LayerStyle (chflame163), MeanCache (facok), Negative Rejection Steering (Reithan), PixelSmile (judian17), Power Shift Scheduler (silveroxides), QwenImageWanBridge (fblissjr), Qwen Multiangle Camera (jtydhr88), RES4LYF (ClownsharkBatwing) —which should really be a standard install anyway, TiledDiffusion (shiimizu), and VAE-Utils (spacepxl).
Additional recommended add-ons include: Custom Node Color (lovelybbq), Custom-Scripts (pythongosssss), CyberHub Lite (cyberdeliaAI), LoRA manager (willmiao), Memory Visualization (kijai), Prompt Manager (ComfyAssets), and TF32 Enabler (marduk191).
Recommended upscalers/refiners include 1xSkinContrast-SuperUltraCompact, Swin2SR, 4xPurePhoto-RealPLSKR, Swin2SR Upscaler (x2 and x4), UltraSharpV2, or browse the OpenModelDB.
Accessory models (e.g., SAM2) should download automatically when first run; so just be aware of any delays and check the terminal window to monitor progress.
Navigation
The workflow is structured for flexibility. With just a few adjustments, it can flip from text-to-image to image-to-image to inpainting or application of Flux.1 Tools 🛠️. Additional unconnected nodes have been included to provide options and ideas for even more adjustments, such as linking in nodes for increasing details. (The workflow does not employ Anything Everywhere, so if a node connection looks empty, it really is empty.)
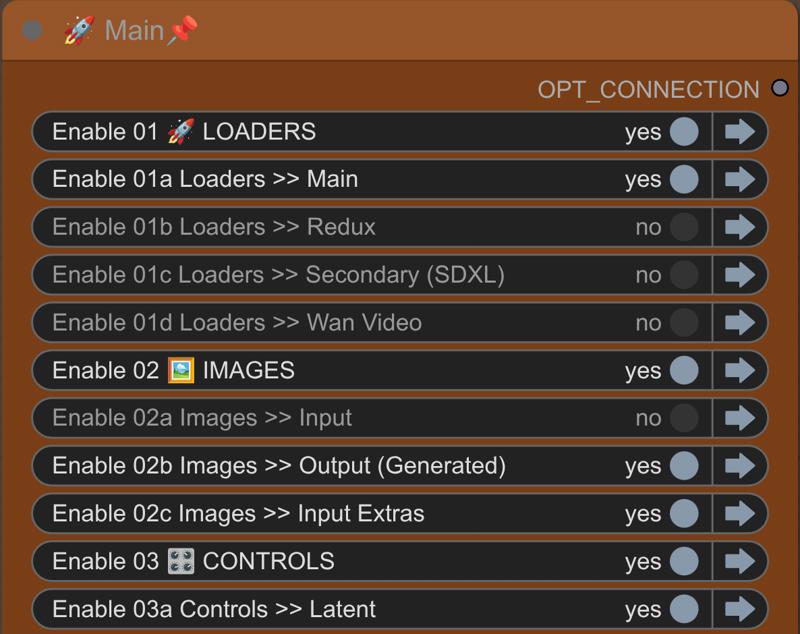
In the Switchboard, flip the yes|no 🔵 toggles to activate or deactivate groups and the jump arrows ➡️ to quickly move to particular groups for checking and making adjustments to the settings/switches.
🛑 DO NOT RUN THE WORKFLOW WITH ALL SWITCHES FLIPPED TO "YES"! 🛑
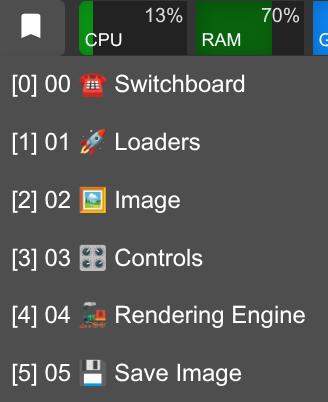
 There are also bookmarks 🔖 to help you navigate quickly.
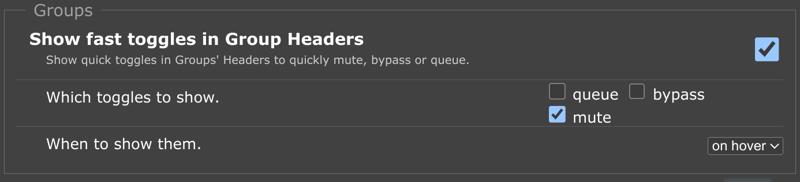
 In the rgthree settings, it is also recommended to show fast toggles in group headers for muting.
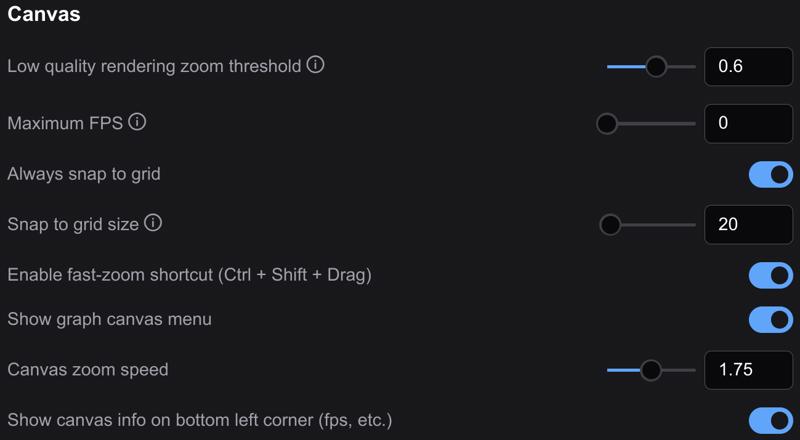
 In the Lite Graph section of the settings, enable the fast-zoom shortcut and set the zoom speed to around 1.5–1.75. The workflow was built with a snap to grid size of 20.
 Most of the workflow is unpinned 📌, so grab any empty space with your mouse to navigate around. You are welcome to pin 📌 anything you like to prevent accidentally moving groups or nodes.
Recipes
This is the default text-to-image recipe 🥣 and should be run first to make sure you have the basics configured correctly.
☎️ ⁘ Toggle on 01a, 02b, 03 all, 04, and 05
03a ⁘ Latent switch = 1 (empty)
03b ⁘ Conditioning switch = 1 (no ControlNets +)
05 ⁘ Save image switch = 2 (generated image)
Once you have the workflow running, it is recommended to drag-and-drop rendered images back onto the ComfyUI canvas to make any additional workflow adjustments. This ensures you will always have a good default workflow as fallback.
Reference the included models & recipes workflow for additional recipes 🥣.
Description
See workflow description.