v2
The workflow allows ultra-fast iterations over different seeds/prompts/images/settings before rendering the final video at full resolution, while removing the need to constantly swap between models (which is ideal for low-RAM setups).
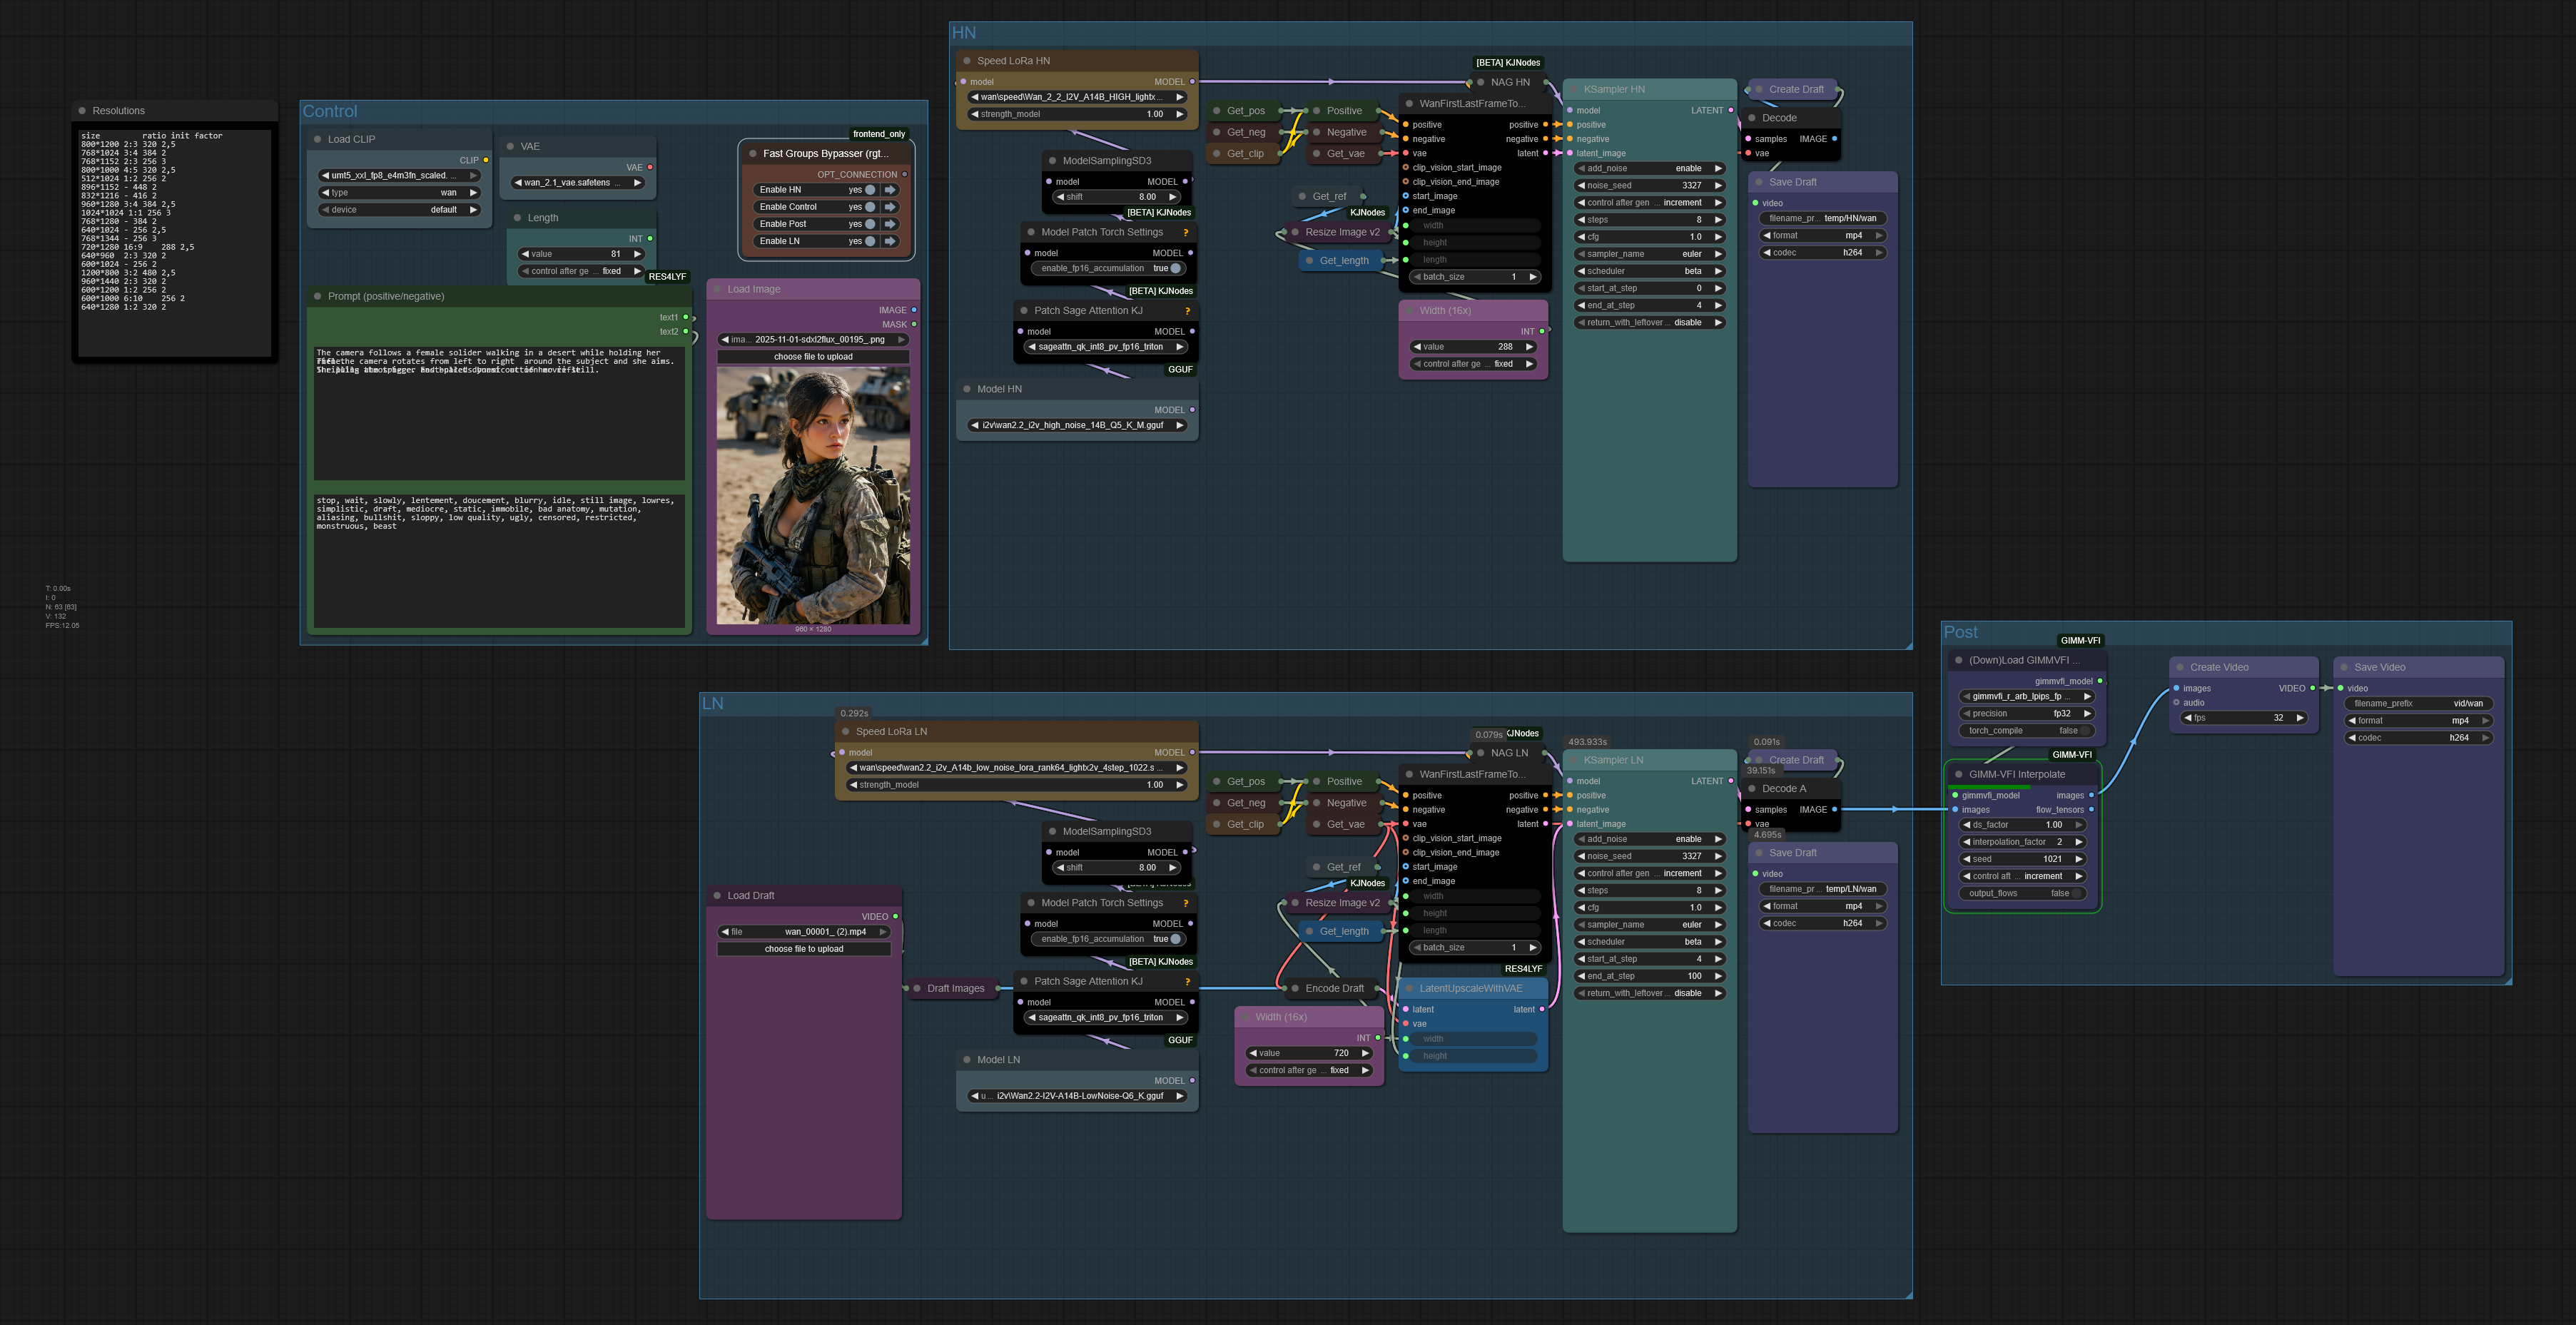
How it works
There are 2 stages:
Generate a draft version of your video at low resolution, using the high-noise model only.
Upscale the video latent to render it at your target resolution, using the low-noise model only.
Process
Stage 1
Disable the groups "LN" and "Post".
Upload your image.
Write your prompt.
Set the low-resolution width (typically, 256, 288 or 320px, depending on the image aspect ratio).
Click "Run".
Stage 2
Drop the video draft created at Stage 1 into the ComfyUI canvas.
Disable the group "HN"; enable the groups "LN" and "Post".
In the "Load Draft" node, select the same video again.
Set the high-resolution width (typically, x2 or x2.5 the width set at stage 1).
Click "Run".
⚠️Important constraint: make sure the video width and height are multiples of 16, at both stages of the process, or the final output will be blurred.
The workflow was intentionnally made as simple as possible to maximize compatibility. Up to you to adapt it further to your needs.
For a simpler but less efficient version, see v1 below.
v1
The workflow significantly mitigates the "speed VS quality" dilemma, allowing users with low-end hardware to generate videos in HD resolution nearly twice as fast!
How it works
The principle is dumb simple: we run the high-noise model at very low resolution, then upscale the latent before injecting it into the low-noise sampler.
Since the original image is also reinjected, with a new Wan wrapper node at the low-noise sampling step, visual details are preserved.
Limitations
The motion does lose a little in subtlety, but the speed gain is totally worth it in most of cases.
Not tested on T2V, probably won't work.Works on T2V too. Simply replace both I2V nodes by a EmptyHunyuanLatentVideo node. Thanks to @axicec for sorting this out.
Getting Started
Replace the models by yours, or follow the links below to download them.
Install the required custom nodes listed below if they are missing from your installation.
Load an image and write your prompt.
Click Run.
Speed benchmark
settings: 65 frames, using Q5_K_M I2V models, 4 steps on high-noise with lightx2v 1030, 4 steps on low-noise with lightx2v 1022 and Fun HPS2.1 loras, euler/beta sampler/scheduler on both samplers.
hardware: RTX 3060 with 12GB VRAM and 32GB RAM.
768*1152px (2:3)
768*1152, no upscale: 20′46″
256*384 x2 then x1.5: 11′16″ (-46%)
256*384 x1.5 then x2: 10′48″ (-48%)
720*1280px (9:16)
720*1280, no upscale : 23′19″
288*512 x2.5 : 15′57″ (-32%)
288*512 x2 then x1.25: 11′57″ (-49%) <- this is the showcased video
Target resolution VS Hardware Requirements
HD : >= 12GB VRAM v
FHD: >= 16GB VRAM ? (not tested, feedbacks appreciated)
Initial sampling resolutions and step settings recommendations are included in the workflow.
Custom Nodes
Required
Optional
ComfyUI-GIMM-VFI (for interpolation)
rgthree (for fast group bypassing) (v2)
Models Used
Wan 2.2 14B I2V, Quantized:
Lightx2v LoRas :
https://civarchive.com/models/1585622?modelVersionId=2361379
https://civarchive.com/models/1585622?modelVersionId=2337903
Fun LoRa:
Edit (v1): the last sampler's scheduler is set on linear_quadratic by default but it should be beta.
Description
The workflow was split into 2 different stages to maximize speed even further.
The 2nd low-noise sampler was removed.
See full description for details.
FAQ
Comments (9)
I immediately tried v2. v2 is faster, but the generated video quality is higher with v1. v2 looks a little blurry.
It did not produce a high-quality video like the v2 reference video (sample). I tried upscaling with low noise at a multiple of 16.
I haven't tested it enough, so I can't be sure of what could be the optimal parameters. Maybe you can try : on the low-noise sampler, set "start_at_step/steps" to "2/6" (it will give more "power" to the low-noise model, things may change more), set the low-noise sampler/scheduler to "lcm/sgm_uniform", or maybe it simply means that decoding>saving>loading>reencoding impacts the overall quality?
@qdr1en I'm grateful that they released v2 so quickly.
I still don't know if re-encoding is the problem, and I haven't been able to test it thoroughly yet.
First, as you suggested, I'll try changing the number of steps, sampler, and scheduler.
@qdr1en I've found some of the cause. It seems that upscaling too much causes the output to become blurry.
When I tried upscaling from 288 to HD resolution like in v1, the output was blurry.
When I tried 640>1280, the output results were almost the same as v1.
And when I changed the sampler and scheduler to "lcm/sgm_uniform" and ran it, the results were even better.
It seems that it's best to keep the upscaling value to a maximum of 2.5x.
what means: Drop the video draft created at Stage 1 into the ComfyUI canvas.
?
The draft is the video created at stage 1. From Windows explorer, drag it, and drop it on your ComfyUI web browser screen: the workflow embedded in the video will show up.
Have you messed around with trying to get SVI to work with the scaling up and down for the low and high samplers? Been messing with it all day with no luck. I like the time savings of having the low res "low" sampler, but Im about to give up.
Hi. Yes I have! Look at the workflow embedded in my latest video (The blonde policewoman that goes 69 lol) - In the "Extended" group, I use PainterLongVideo node at high-noise (no start_image provided, but previous_video and initial_reference_image instead), and WanImageToVideoSVIPro at low-noise (I made one l mistake, the SVI lora should have been deactivated at high-noise).
To avoid blur/unfinished effect, it is safer to have more steps at low-noise than high-noise.
Also since using SVI decreases prompt adherence by a lot, I prefer starting with a normal WanImageToVideo node for the 1st sequence.
To me the final output looks OK but if you notice any side effects I am eager to know.
@qdr1en Ill check that out. Thanks!