The BFS (Best Face Swap) LoRA series was developed for Qwen Image Edit 2509, specialized in high-fidelity face and head replacement tasks with natural tone blending and consistent lighting.
Each version builds upon the previous one:
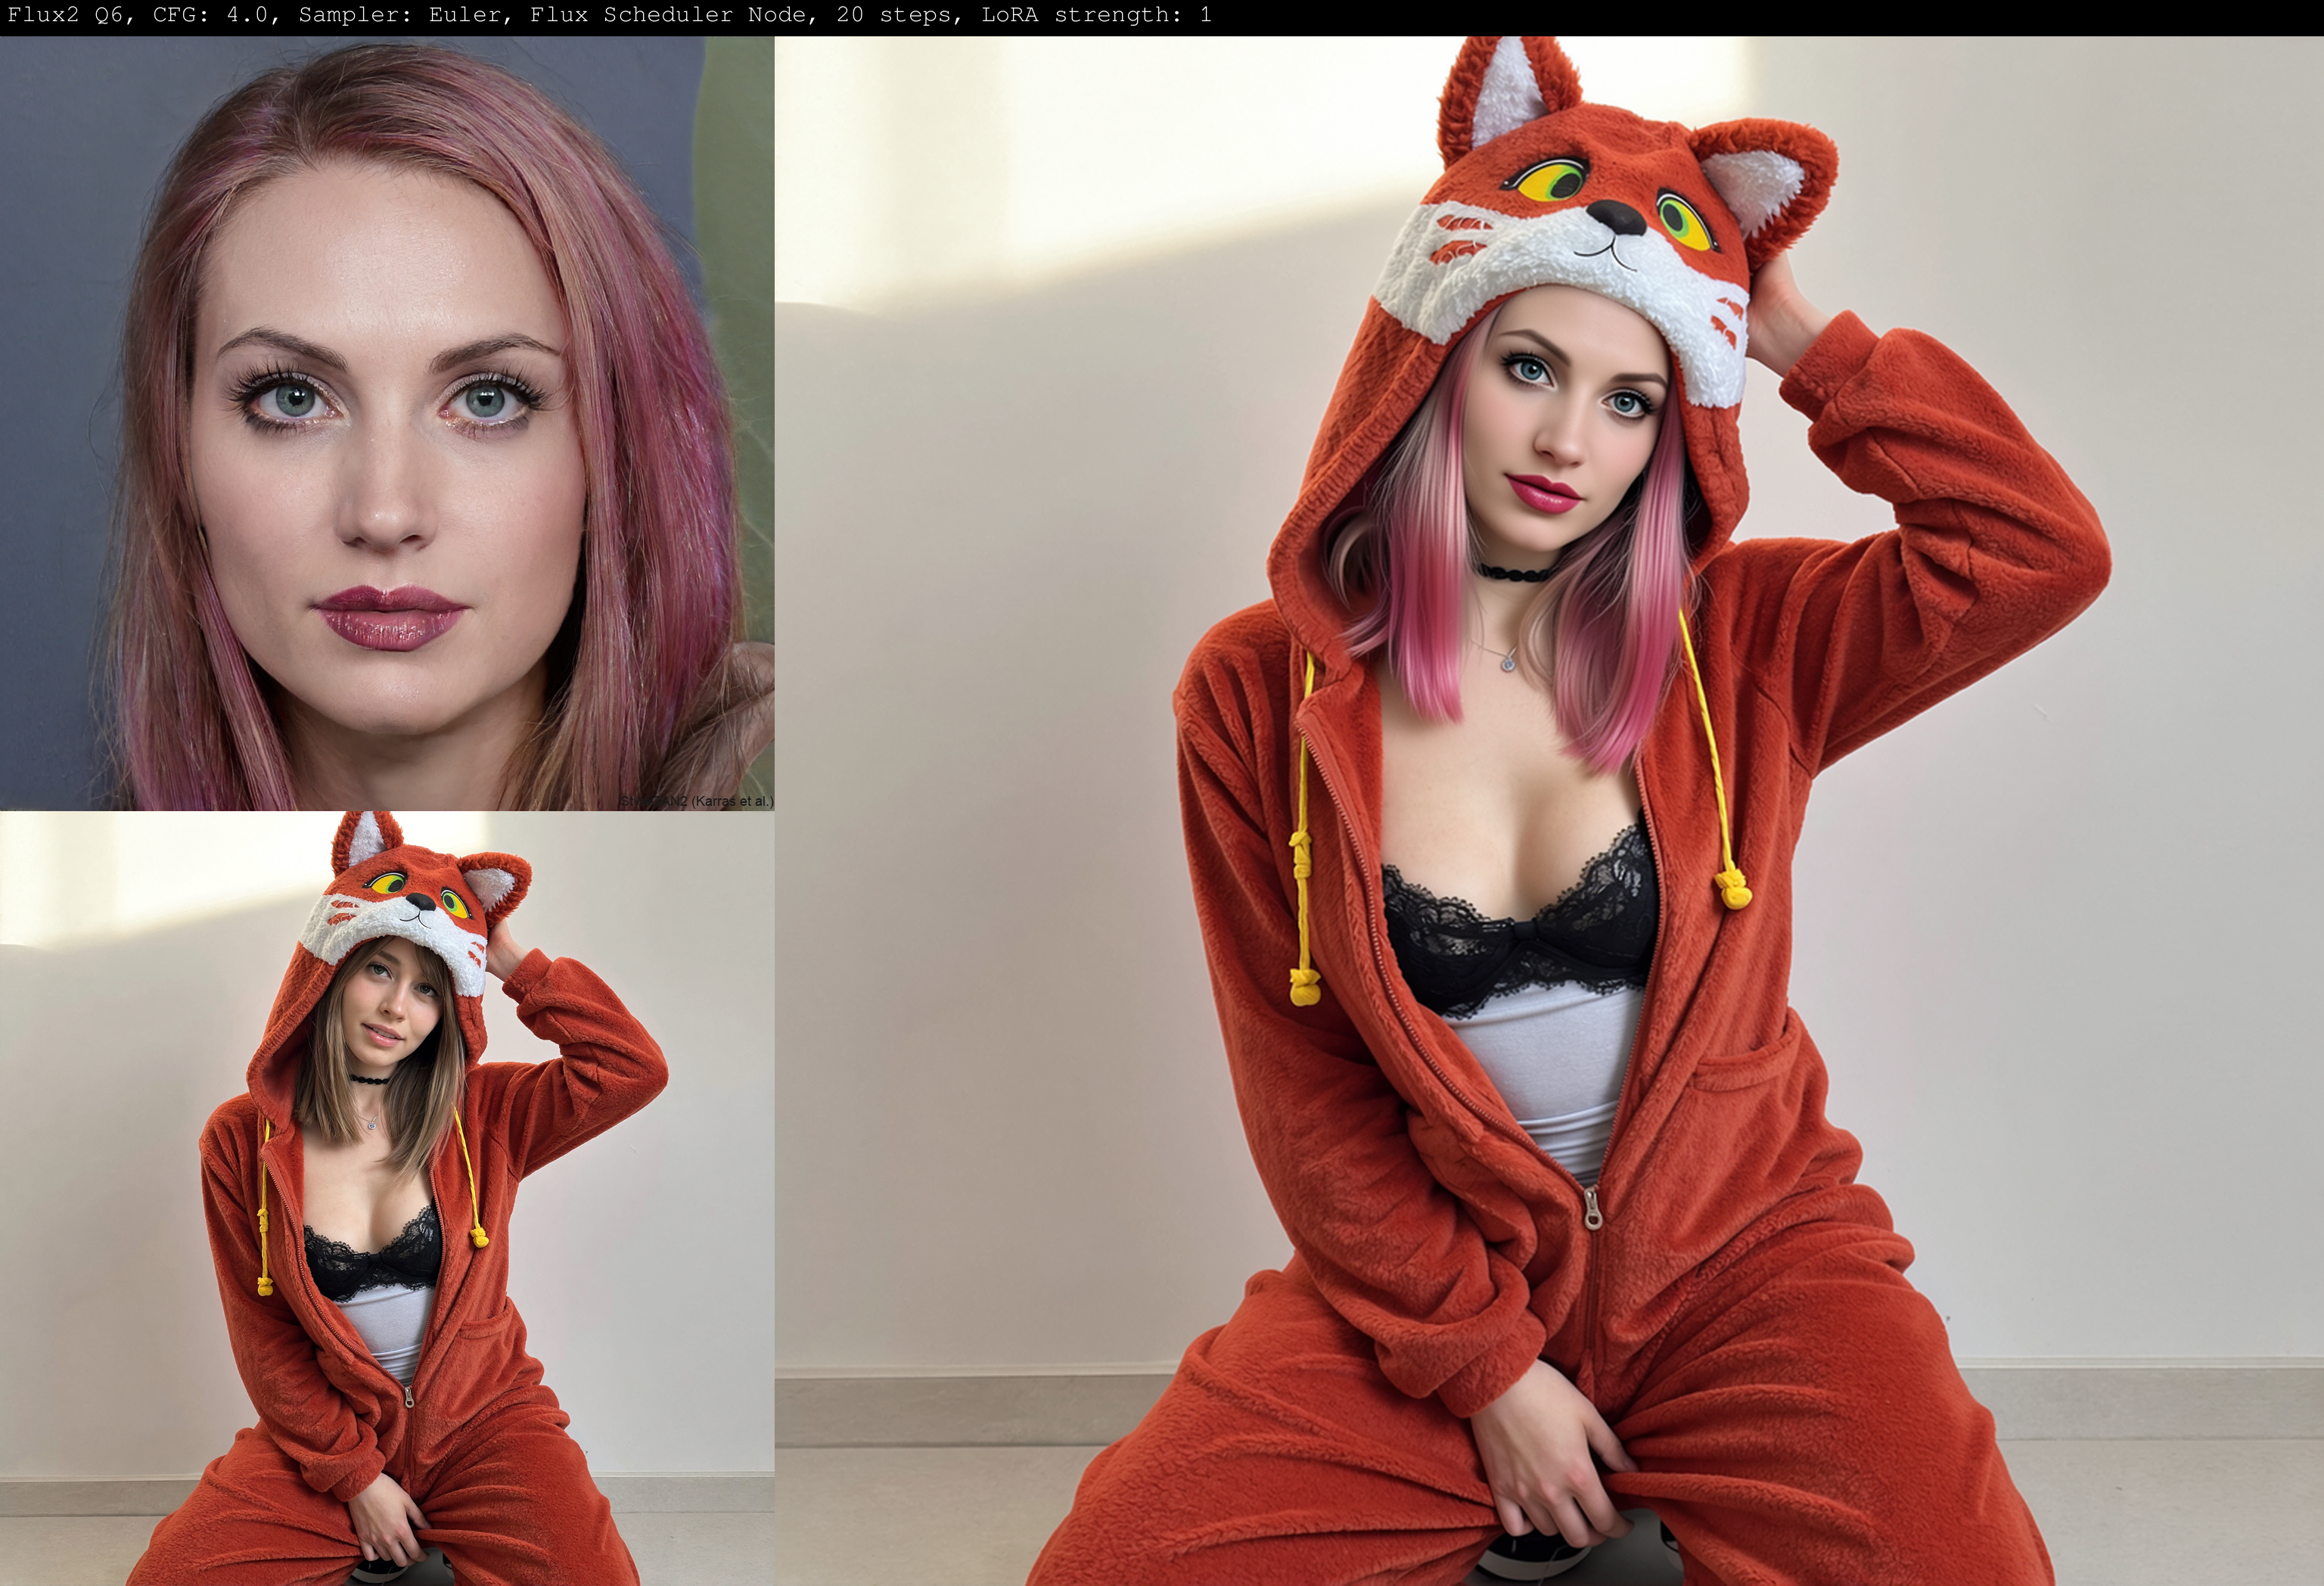
🧠 Focus Faces: precise face swaps, keeping the original head shape and hair while transferring facial identity and expression.
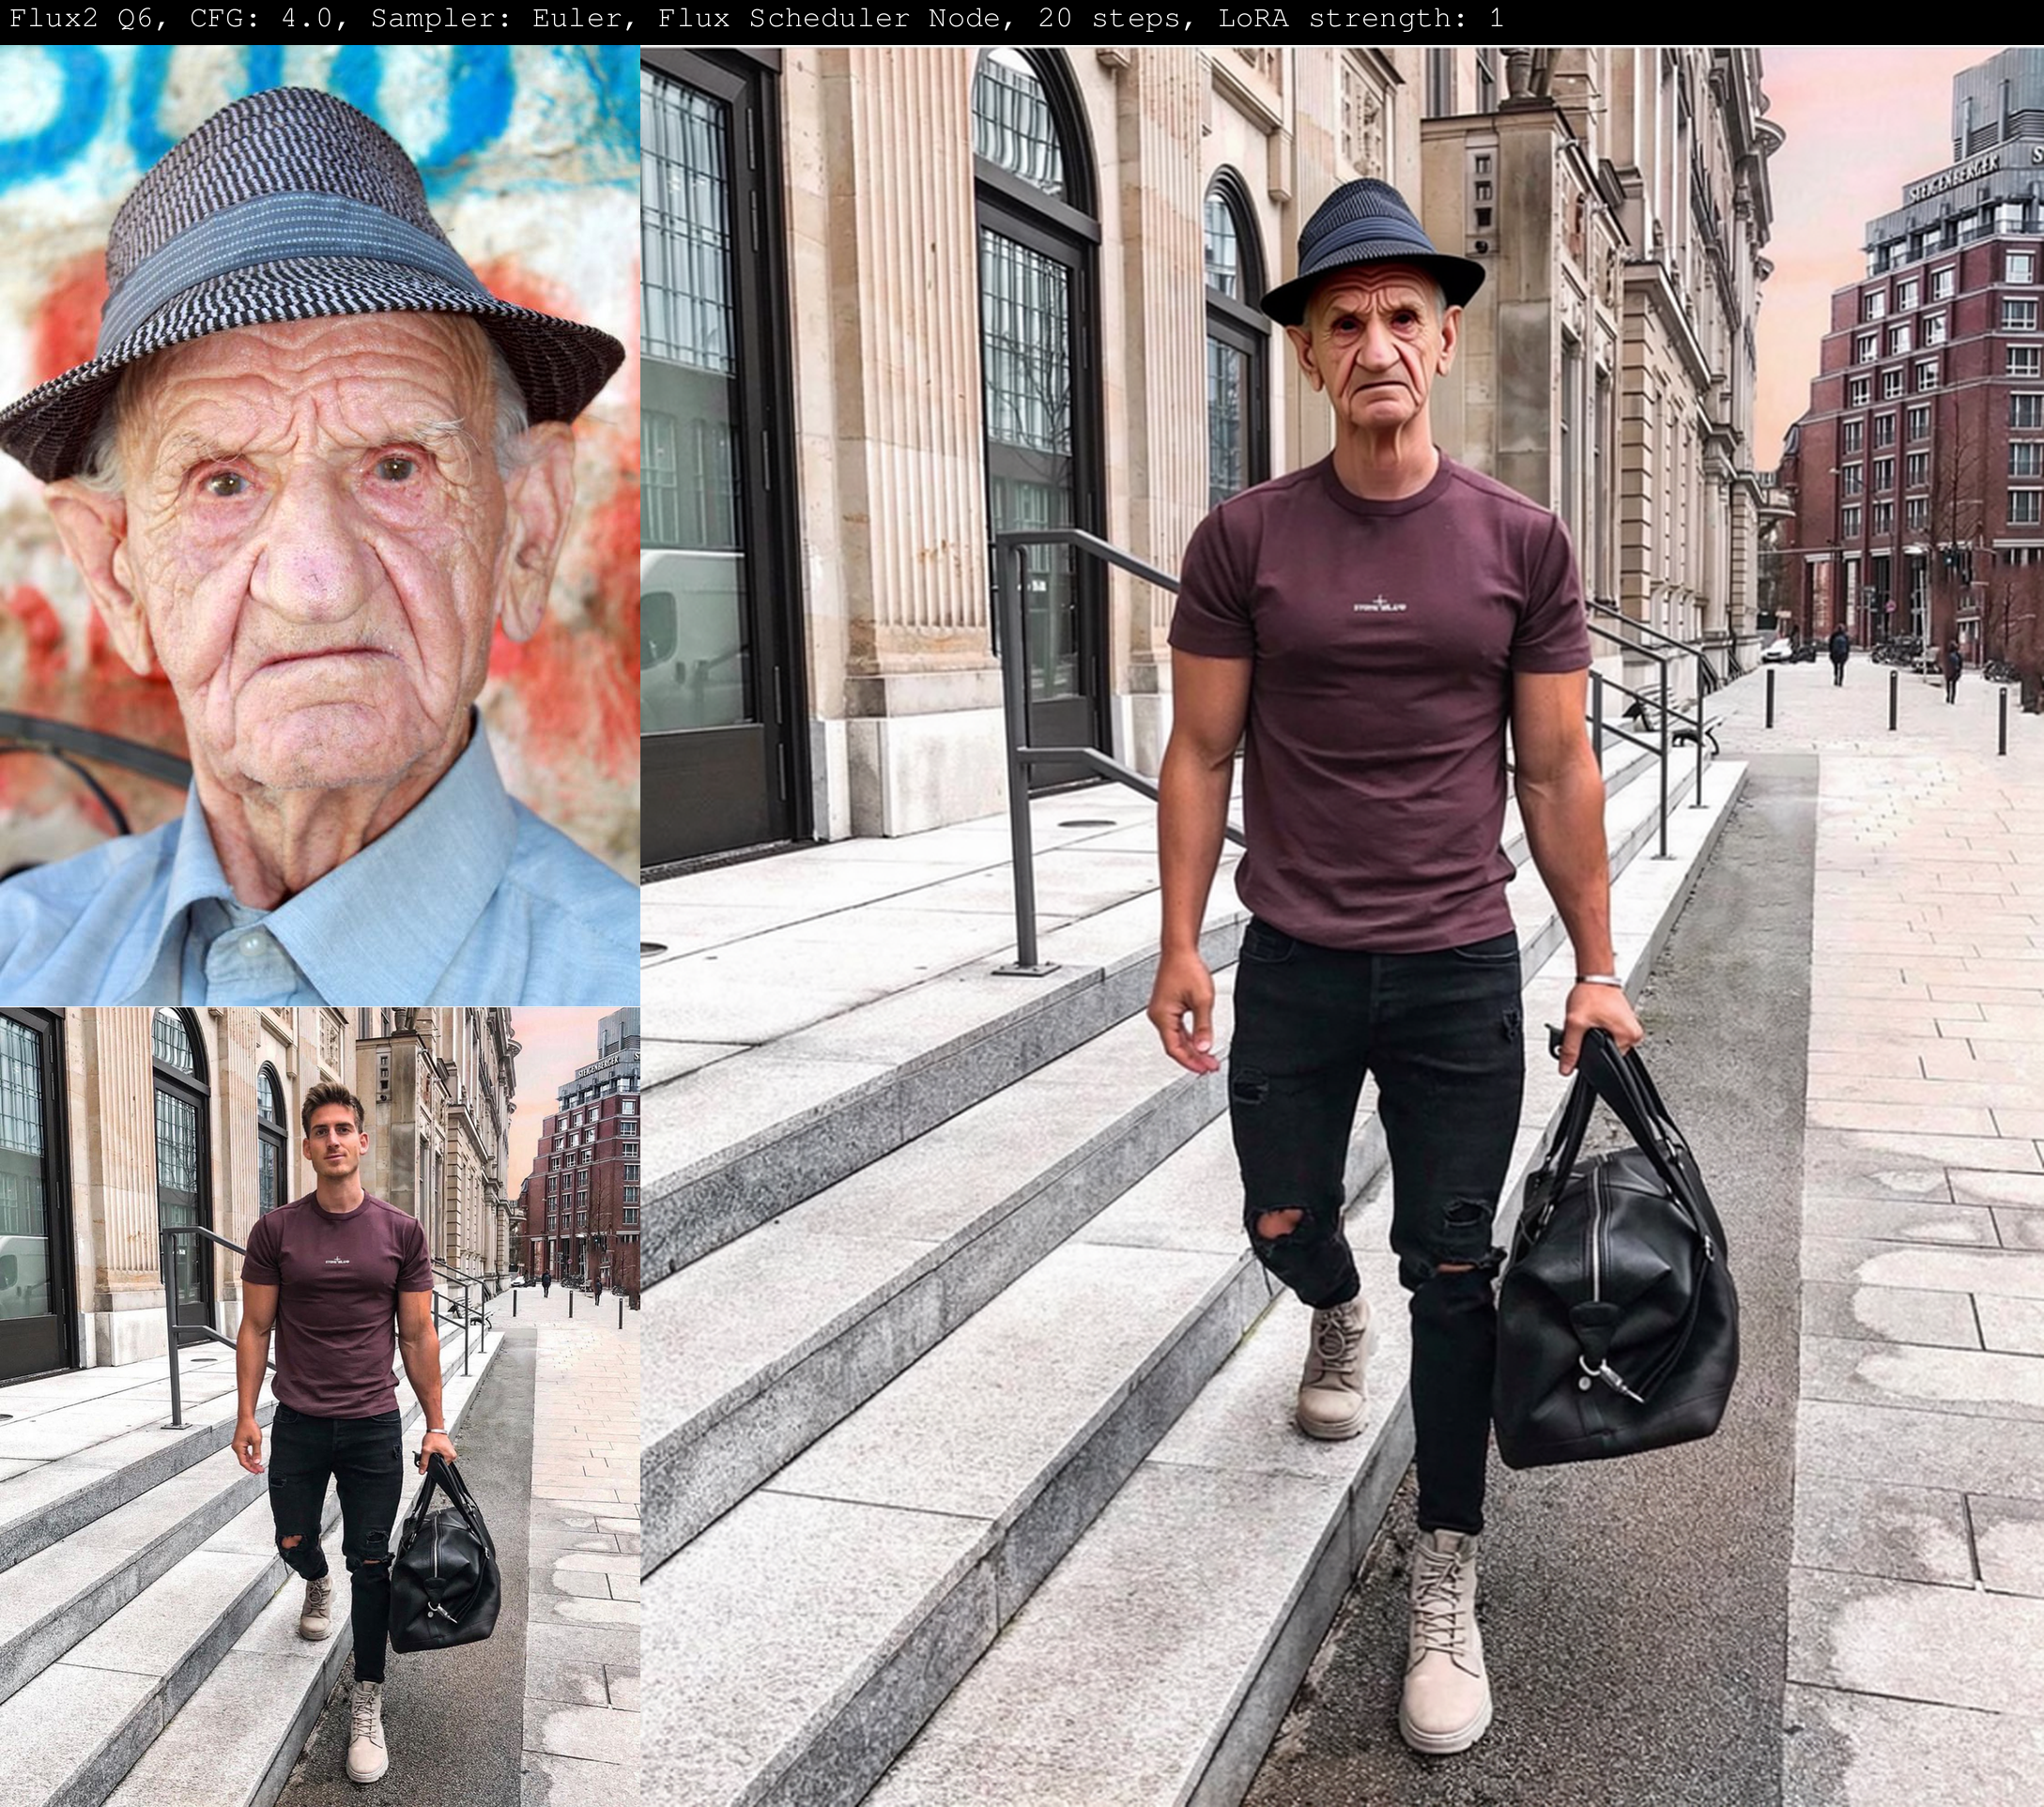
🧩 Focus Head: stronger head swaps, replacing the full head (including hair and pose orientation).
The 2 versions complement each other, one is focused on face swapping and the other is focused on head swapping.
Share your creations that do not involve public figures or individuals who have not given consent. By sharing, you will earn Buzz, and your posts directly help me improve future versions by identifying and correcting potential issues.
Important Note: If you are going to use Qwen Image Edit 2511, update your comfyui before anything else, because without it you may have problems with completely distorted or ugly images.
Workflows:
Head/Face Swap Workflow - Qwen-Image-Edit-2509 | Civitai
My Custom Lightning LoRA:
Custom Lightning - Qwen Image Edit - 2511 | Qwen LoRA | Civitai
Alissonerdx/CustomLightning · Hugging Face
Test V3 here:
BFS Best Face Swap - a Hugging Face Space by Alissonerdx
Face Swap Video Tests (V1):
Face Swap - Qwen Image Edit 2509 (English)
Another important thing is to update ComfyUI. Many people are having terrible results because they haven't updated ComfyUI. The 2511 model has an architecture with a few more layers, and that's why ComfyUI needs to be updated.
About Flux 2:
I've done my best so far, but the results aren't as good as with QWEN. The base Flux 2 model can already handle head swapping, but with some difficulties. The goal of this LoRa was to try and improve that a bit, but I haven't achieved very good results. It might be a configuration issue, so here's this beta version for you to test.
Try with CFG: 8.0
PERSONAL NOTES:
The swap quality will always depend heavily on the quality of your input images. Larger, clean images with little noise or compression artifacts generally produce the best results. Keep in mind that the model always follows the quality of the body image, since it becomes the final rendered frame—so even if the face source is high-quality, a low-resolution or noisy body image will limit the outcome.
Most of the images I generate are created without using the LightX2V lighting LoRA, since I noticed that enabling it tends to make the skin appear more plastic-like and reddish, and finding the right balance requires extra tuning that I didn’t focus on. If anyone has discovered good configurations, feel free to share them in the comments of this template.
In short, using LightX2V makes the model less versatile because it operates with a fixed CFG value of 1.0. So before assuming it “didn’t work,” I recommend first testing the workflow I published without LightX2V to compare the results.
If you’re getting results with too much contrast, overly strong colors, or plastic-like textures while using LightX2V’s lightning models, try reducing the number of inference steps. For example, if you’re using the Qwen Image Edit 2509 Lightning (8 steps) model, try running it with 4 steps instead. The excessive contrast often comes from running too many steps while CFG remains fixed at 1.0.
If you encounter similar issues without using the lighting LoRA, try lowering the steps as well—e.g., from 20 down to around 16 or fewer—and reduce CFG to values like 1.2 or 1.5, which can help produce smoother, more natural results.
Another important detail: in images where the body is positioned farther from the camera, the face region becomes smaller, which can reduce swap accuracy and overall quality. This happens because the model has less pixel information to work with in that small facial area. To handle these cases, you can use my older workflow, which automatically crops the face region from the body image and performs an inpainting-like process to improve results in distant or small-face compositions.
Finally, if you notice loss of similarity between faces or poses—especially when the reference and target images differ significantly in aesthetics or angles—try increasing the strength of your head swap LoRA slightly (for instance, to 1.2 or 1.3) to restore consistency.
⚙️ BFS — “Focus Faces”
Trained on 240 image triplets (face, body, and result),
with a LoRA rank of 16 → later increased to 32,
and gradient accumulation = 2, running for 5500 steps on an NVIDIA L40S GPU.
This version produces stable and detailed face swaps, preserving expression, lighting, and gaze direction while maintaining the body’s natural look.
🔧 Model Notes
You don't need to use my workflow to make this lora work, if you are having problems with it use yours, it is the simple workflow of qwen image edit + lora and the inputs in the right order: face image 1, body image 2.
Quantization: not guaranteed to work below FP8 (avoid GGUF Q4).
Face mask: optional — remove if MediaPipe or Planar Overlay cause issues.
Pose conditioning: use MediaPipe Face Mesh or DWPose if you need more alignment control.
Lightning LoRA: may produce plastic-like skin, especially when mixed with other Qwen-based LoRAs.
⚙️ Recommended Settings
Samplers:
er_sde + beta57 / kl_optimal / ddim_uniform(best results)ddim + ddim_uniform (sometimes most realistic)res_2s + beta57
Don't get attached to one setting, sometimes if it doesn't work well with one, switch to another.
Precision:
🧠 Best:
fp16⚙️ Recommended:
gguf q8orfp8⚠️ Below fp8: noticeable degradation
Inference Tips:
With Qwen Image Edit 2509 Lightining LoRA → use 4 / 8 steps for fast generation.
Without it → use 12–20 steps, CFG 1.0–2.5 for realism.
🧬 BFS — “Focus Head”
The “Focus Head” version was trained as a continuation of Focus Face, extending the dataset and shifting focus toward full head swaps.
It was trained on a NVIDIA RTX 6000 PRO, rank 32, for 12,000 steps, using 628 image pairs (face, body, target, and sometimes pose maps generated via MediaPipe).
🔹 Training Phases
Standard Face Swap – same Focus Face, focusing on facial identity.
Pose-Conditioned Face Swap – added pose maps to align gaze and head angle.
Full Head Swap – replaced the entire head (including hair) for stronger identity control.
After ~2000 steps, the focus moved toward head swap refinement.
At ~4000 steps, the dataset was narrowed to perfect skin-tone matches, and by the end of training,
the dataset evolved from 628 → 138 → 76 high-quality samples for final fine-tuning.
⚠️ Note:
While Focus Face can still perform standard face swaps, it’s more naturally inclined toward full head swaps due to its data balance.
This was intentional in part, but also a side-effect of dataset distribution and mixed conditioning.
⚠️ Important Notice
Do not share results involving real people, celebrities, or public figures.
Civitai’s moderation may disable posts that violate likeness or consent rules.
This model is intended only for artistic and fictional characters, educational use, and AI experimentation.
I take no responsibility for any misuse of this model. Please use it responsibly and respect all likeness rights.
Description
I tried my best, the results aren't as good as with QWEN. The base flux model can already do head swapping, but with some difficulties. The goal of this LoRa was to try and improve that a bit, but I couldn't achieve a very good result. It might be some configuration issue, so here's this beta for you to test.
FAQ
Comments (68)
Will you try a version with the (not yet released) z image edit model?
yes definitely
@NRDX Have you tried it with Flux 1 Kontext?
@aungkhant0911 No
"Flux 2 (trash)" 😂😂😂😂😂
hahaha Man, I've never seen such a bad model for training like this. I don't know if something is missing for training in edit mode or something, because I've trained with different versions and none of them work well.
@NRDX Guess they felt late after Qwen being around so they urged it and messed up. Or it's just proper bad 😅
@TheGlowingGuardian I simply don't know what they did; I know I only get terrible results. Adding billions more parameters doesn't always make the model better; Z-Image is there to prove otherwise.
@NRDX Yeah I'll give ZIT a go, I'm a VRAM-let so Flux2 isn't for me, and seems dead-on-arrival already
flux came again to destroy our achievement from qwen , wasting time and resources. wait hopefully for qwen next hit.
Good Lora, but the problem here is that after replacing the face, the picture becomes dim, how to remove it? Thanks
Are you using the v3 workflow that I provided? If so, it's probably changing color because of the CFG Norm. If you set it to 1.0, it will revert to the original color, but it might become oversaturated if you use Lightning LoRa.
Thank you very much for your LoRA!
Unfortunately, it doesn’t change anything in the picture :(
I mean, the workflow “as is” works, but when I load this LoRA into the workflow, it does not.
I asked about it on Reddit, and they told me to ask here ;)
The question with images is here on Reddit:
https://www.reddit.com/r/StableDiffusion/comments/1p5aqga/lora_not_affecting_output_in_bfs_focus_face/
Hello, so for it to work you need to send the body image as a reference first, and then the face image. It's the opposite of the other versions. Are you sending the images as input in that order?
Ah, okay, I see here that you're only using the Focus Face to swap faces. Did you encounter any errors in your workflow?
@NRDX Hi again!
For better understanding here are the setups.
With casual workflow:
https://i.ibb.co/99ZdWkbF/Screenshot-2025-12-03-at-18-33-44.png
And with this Lora:
https://i.ibb.co/Ldf6yZrZ/Screenshot-2025-12-03-at-23-47-53.png
I changed nothing here so is it in the right order?
https://i.ibb.co/DgL1f9Fp/Screenshot-2025-12-03-at-23-52-02.png
Regarding the errors, there was nothing strange in the interface, but there may be something in the console:
https://i.ibb.co/Pv88sJ7c/Screenshot-2025-12-03-at-23-55-42.png
https://i.ibb.co/1GhpjcrG/Screenshot-2025-12-03-at-23-56-15.png
https://i.ibb.co/PGjcSxjL/Screenshot-2025-12-03-at-23-56-50.png
In fact, my main goal is to change the person in the photo, leaving everything else. I'm not sure what exactly is right, please tell me if there is a more correct way ;)
@maxet24 To use V3, the inputs are reversed; first you need to pass the body and then the face. I made a different workflow for this, also called V3 with the same name as LoRa. Use that workflow and it will work.
https://civitai.com/api/download/attachments/492910
@NRDX Thank you very much, it worked!
https://i.ibb.co/DHzXwzff/Comfy-UI-00002.png
By the way, the error occurred when loading "Cannot convert a MPS Tensor to float64 dtype as the MPS framework does not support float64. Please use float32 instead." but I think it's because you can't run it on a Mac. I temporarily changed the sampler to dpmpp_2m_sde and it worked.
Give me, please, what other tips can there be to make the result even more realistic?
What settings should I try to change?
@maxet24 You can try combining it with other Loras skin detail and multi-angle effects; I'm doing some tests with that right now.
@NRDX Thank you!
Could you please leave me a link to multi-angle LoRA? I found only skin:
https://civitai.com/models/2097058/qwen-edit-skin
And also is it ok for No Lightining to load for 500 seconds?
@NRDX And also is it ok for No Lightining to load for 500 seconds?
For example your resault:
https://civitai.com/images/112867196
Is awesome and what i want actually ;)
@maxet24 So what does 500 seconds to load mean? Mine takes a long time here too, even on the 5090. Since there are more steps, it ends up taking longer, but the quality is also better than with Lightning. One thing you could try is using, for example, 8-step Lightning LoRa and try reducing its strength to something like 0.30, 0.40 or even less, and try reducing the steps from 20 to about 12, 14... while keeping the CFG at 2.5. This is because in this case, it's just to kind of generate in fewer steps than 20 without losing CFG power. That's why the Lightning LoRa strength is much lower, because it's what gives the image a plasticized look but increases the inference speed. But it's all experimentation; you can try using all this with Lightning LoRa and get a good result, it really depends on testing.
Please tell me, I want to do a face swap in a photo but keep the entire skin of the face on which the changes will be made. Will I be able to do this?
You can try using the focus face version and use a kl_optimal like I show in the video.
Thank you very much, exactly what I was looking for and much better than Reactor. Is there a way to choose which head you want when there are two people in the picture?
The only way to do this would be to segment the head you want to apply the swap to, then return it, and then do the same for the other head.
In TextEncodeQwenImageEditPlus, there was still one field available for images. I copied the image field from image 1 and then wrote the following prompt:
head_swap: Use Picture 1 as the base body image. Use Picture 2 as the first face reference. Use Picture 3 as the second face reference. Replace the head on Picture 1 with a realistic blend based on the two face references (Picture 2 and Picture 3). Ensure correct anatomy, matching skin tones, shadows, and lighting so the final result looks like a single coherent, realistic person. Ensure anatomically correct proportions and smooth blending. same skin like the body from picture 2
nice work, okay i have my own way (inpaint).
but maybe you get better result at least for qwen if you replace first and second image ... if you take a look on qwen-image hugging, mostly the last image is the base ... try to translate the china stuff so it called "Based on the woman in Image 1 and the man in Image 2, generate a photo and describe it as follows:" tahts allready trained ... but in the end i dont know...
for flux2 seems a json format for training is the best.
Yes, my first version was full inpainting until I trained the first LoRa. The big issue with inpainting is that it doesn't work for all angles, it doesn't work when there are objects on the face, it doesn't work in various aspects and angles, since you depend on creating a mask over the original face. Furthermore, it can assume that the size of the mask will be the size of the head, and this will generate gigantic heads. There's no delimitation of where the head begins and ends. In short, that's why LoRa works well, and you can even use it together with the inpainting method if you want. I spent almost two months training a reasonable LoRa, from the full workflow version to V3. I trained for Flux 2, but it's literally pure garbage, very poor results. I even trained in JSON format.
@NRDX i see you tried also a lot ;)
yea .. inpaintin i have a workflow where the area is upscaled and after downscaled ... and yea you must prompt carefully and draw the mask carefully ;)
this one works likely in fux2 even without lora, may you can adjust a bit an train more on that ?!?
{
"scene": "Swap the face from image 2 into image 1, preserving all other elements including pose, clothing, face expression and emotion. Adjust the position, size, direction, and facial expression from image 2 to match the face in image 1. preserve original Direction of gaze and face and head and nose and eyes and facial expression from image 1. maintain anatomical body proportions. Transfer the facial expression from the face in image 1 to the face in image 2.",
"subjects": [
{
"person": "original body from image 1",
"description": "Keep full body/pose/clothing/hair as in image 1; only face is replaced with the face from image 2.",
"position": "same position as in image 1",
"action": "same action as in image 1",
"nudity": "clothed as in image 1"
}
],
"style": "photorealistic",
"lighting": "same lighting as image 1",
"mood": "same emotional tone as image 1",
"background": "same background as image 1",
"composition": "same framing and layout as image 1",
"camera": {
"angle": "same camera angle as image 1",
"lens": "same lens type as image 1",
"hair": "same as image 1",
"direction of view": "same as image 1",
"facial expression": "same as in image 1",
"depth_of_field": "same focus behavior as image 1",
"face": "person from image 2"
}
}
Is there a way around that the new head take the shape of the original head?
Using the original head shape has always been the opposite of what I was looking for, as it causes the person's identity to be lost. If you want, you can try doing this by passing a head pose map from the body image, or experiment with some other setting, such as using kl_optimal.
@NRDX thank you for the reply, I try that
Try this one with a bunch of images. This works perfectly. Thank you for taking the time to make this. I have only one question: is it possible to maintain the original expression of image 2 (the face swap image, not the donor face?? It works great, don't get me wrong. But I noticed if the person's face donor is smiling and the face planter is frowning, it will always take the expression of the donor's face. Other than that I have no isses works chef's kiss
You're saying it will assume the expression of the head that's being placed on the body, is that correct? If that's what I understood, yes, it really does that because I haven't yet managed to get a perfect dataset in that aspect; I'm trying to put one together and train version 4.
@NRDX I've been playing with it all night, it's honest, THE BEST that I have used, probably better than even Seadream. As far as keeping the target's expression, I haven't been able to do that, no matter what I try. However, what I DID discover that almost makes up for it is this.....IF you put a description of the target's face BEFORE your prompt....i.e...Your prompt - "head_swap: (the woman has a sad face expression), start with Picture 1 as the base image" if you put any description there, it works!!
@The_Last_Goblin_King Okay, I'll test that. I'm putting together a dataset for v4 that I want it to copy the expression on. Thanks for the feedback.
@NRDX Im going to post an image below and you can see what I mean (sorry I deleted the concat part I never use it)
@NRDX Oh, also, is there a way to modify this so it can replace more than one face? Or maybe allow the option of an index face?
After all this time here on CivitAI, this is my first comment, because I have to say Thank you very much for this perfectly working Lora and Workflow!
Thank you very much for the feedback. There's still a lot to improve, but we're on the right track.
Anyone know why I get a weird bar at the bottom of every swap? The swapping is working GREAT, but its got a weird sliver of a bar at the bottom of the image that resembles the very top of the image. It's almost like a tiny sliver was cut off the top and attached to the bottom.
This happens to me too, but I still don't know why, if it's some kind of resolution problem. I also haven't checked if this happens when using reference latent instead of passing the images directly in the Text Encode.
@NRDX yeah ive tried so many resolutions and get nail it down! we will figure it out eventually
@NRDX I think I figured it out. Qwens VAE processes images in 16-pixel strides. Changing both resize image v2 nodes from divisible_by=2 to divisible_by=16 prevents latent misalignment. that was causing the decoder to wrap top rows into the bottom
EDIT: well now the sliver is on the right side of the image lol
Custom sampler does not work on MAC because it uses float64 instead of float32.
If I have a picture with 2 faces/heads, is it possible to select which one to face swap? I have used the V3 version successfully.
You can create a mask on the face you want and then use the Inpaint Crop (Improved) node, which is in the custom node called comfyui-inpaint-cropandstitch. It will crop an image from the region of your mask. Then you use this image to perform the swap and then restore it, already with the swap done, to the original image from which it was cropped.
this doesn't work with qwen edit 2509 nunchaku, right? it just outputs the head. other than that it works really great. upscale your pics with SVR2 before!
I don't test anything with nunchaku, I really don't know if it works or not. When you tell me to upscale my images with SVR2, are you referring to my dataset or my examples? If I'm referring to the examples I post, I don't improve them with upscaling because otherwise it would be fake. The real quality of just applying LoRa isn't a high-quality 4K image.
Nunchaku doesnt like some loras it seems, but it works with others. Nevermind, the results with FP8 are outstanding, but reducing the cfg norm to 0.94-0.96 often is necessary.
What i meant with the SVR2 comment: upscaling the head and body pics before input greatly improves the result. E.g. with SVR2 (7b sharp). Its the best open source upscaler IMO.
@MoreColors Ah, I understand now, that makes perfect sense. Upscaling before the swap makes sense if it doesn't affect the person.
It does work with qwen edit 2509 nunchaku. Did you check you used the Nunchaku Lora loader? And that the input images were in the right order?
Hi ! The whole world must ask you about this this days, but as I don't know where, I ask you there :
Do you plan to train this for Z-Image ? Maybe waiting for Z-Image edit would be needed ? I must say that, even with a dedicated lora, I don't manage at time to achieve the same degree of similarity/consistency in Z-Image than in Qwen, with your process or Eigen banana one.
All the way a gigantic thanks for your works, loras, vids ! ♥
Yes, I'll definitely practice this for Z-Image Edit, I'm just waiting for it to be released. There's no way to practice this for Z-Image Turbo because it's not an editing model.
Excellent lora, works beautifully with the V3 workflow with lightning. It's so good that the only nitpick is the output image changes slightly in color/saturation, which is also seen in the example images. Is there any way to prevent that?
Probably because, if I'm not mistaken, in the v3 workflow I changed the CFG Norm to a value below 1.0, so try changing that value back to 1.0.
Hello! how to run this on draw things on mac, not able to find the same samplers
Unfortunately I don't have a Mac to test this on, haha.
Don't try, it doesn't apply to the DT client in Mac. I tested it for 6 hours and tried all the different settings. No matter how I adjusted it, it generated the same face, an unrelated but identical face.
simply amazing and works perfectly with custom workflow!
i can't install "WA_SkinToneColorMatch" node. how can i fix it? i use python3.12
Don't use that, use workflow v3.
@NRDX Is there an alternative node to use to get it to match the skintone of the image of the body I am swapping the face onto. I am doing cosplays and some of the characters have different color skin. Not human lol