
!WIP MODEL!
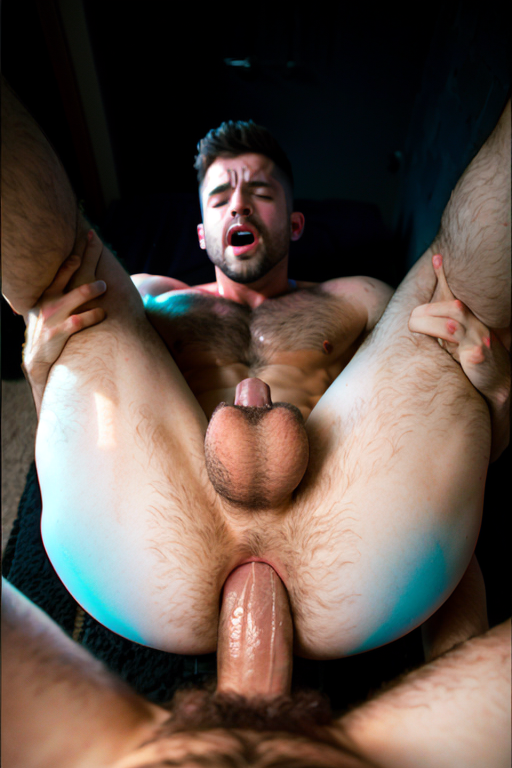
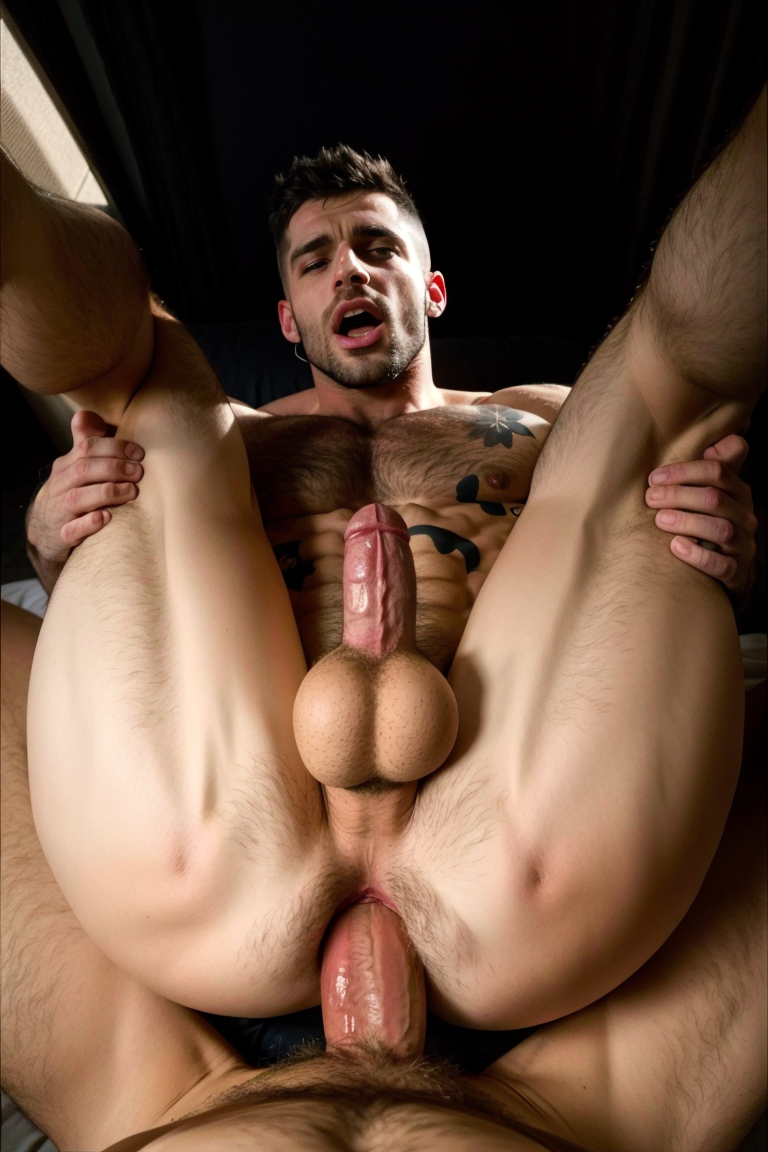
Does what it says on the tin, nudges images towards missionary POV-ish view (non-pov soon). Handles dongs decently well without additional LoRA (dong lora soon), which is neat. Recommended weight around 0.5-0.8 to avoid watermarks.
Versions
All the versions are basically the same, but have different quirks. I recommend trying them all out.
Missionary - Base model
Alt - Base model with OUT blocks slightly pruned in an attempt to fix watermarks, trends more towards vagina-holes sadly. Will probably fix later
Half - Midway checkpoint, I like it more for certain prompts
Current issues
Watermarks: Dataset contained a lot of images w/ watermarks, LoRA will occasionally output, will rebuild when I'm less lazy
Mysterious left-corner man: For whatever reason it really latched on to 3 images of men in the corner of the frame, idk how to fix it just drop the weight
"riding" pose: Model quirk, I can't really do anything about this due to the poses being similar
Condom: There is 1 (o n e) image of a dong with a condom in the dataset (now nuked)
Prompt advice
I recommend avoiding plurals as it can get messy pretty quick. Use man instead of men, etc. Negative weighting hands also helps with random hands appearing, but it'll always be flawed.
LoRA need something to latch onto, the model has no text encoder training so you have to give it something to go off of. I recommend either throwing in sex or anal, either work, 'lying' also helps, and I've gotten good results with "solo". Also recommend leaving out penis unless you're doing solo-heavy images.
Feel free to message me on discord @fleshtexture if you'd like help
Description
FAQ
Comments (13)
Thank you!
....
thank you so much 🥲
Finally! some sex position for the gays. Thank you so much for this, can't wait to try them out..
YOU are a GOD.
Got some nice results!
Many thanks! Gay anal!! It works quite good
This looks good. How do I do this?
The first step is to find a partner. If you already have one, then you can skip this step. Next, it's best if you are both in the mood.... 😉
I'm not sure what you mean about "how to do this" but I'd be happy to continue explaining the remaining steps if you wish, if you're asking how to do that.
@dita )) i mean how do i generate such pics?) i have tried sd many times but it is never even remotely as good )
@peteredson That's a pretty broad topic, that goes beyond just this LoRA. Of course I can't cover it all here, but hopefully these few comments will help. There are quite a few tutorials on the Net. Have you read one or more of those? What tool are you using? Automatic1111, ComfyUI, InvokeAI, or something else? If you are using one of the generation sites like PixAI.art or Mage.Space or Tensor.art, then you probably won't be able to make something like this. Generation sites are only recently starting to add support for LoRAs, and even the ones that allow NSFW generally don't include LoRAs like this one. So, yeah, you'd have to be running your own system to use something like this LoRA.
Once you learn the basics through a tutorial, such as what CFG scale is, how to add or remove weight from part of the prompt, CLIP Skip, steps, sampler, what a LoRA and embedding are, etc., then it's mostly a matter of finding the right settings.
I use Automatic1111 so that's all I can comment on specifically. (If you aren't using it, then this will probably not help a lot.) It has a feature called X/Y/Z plot, which can help you to find those settings. For instance, you want to test out a prompt, and you know which checkpoint (base model) you want to use, and if you want to use LoRAs, etc., then you've got those downloaded and installed and you're adding them into the prompt. But what you don't know are good values to use for sampler, step count, clip skip, seed, cfg, etc. What do you do? You make an X/Y/Z plot.
Here's what I do in that case: Go to the X/Y/Z Plot in the Scripts section of the txt2img tab. I set the values to something like this:
X axis: CFG Values: 5-13 (+2)
Y axis: steps Values: 15-40 (+5)
Z axis: seed Values: -1, -1, -1
Include sub images: On
Include sub grids: On
Long story short, you get this grid of many different images made with all those different settings, and you find the one that looks the best. And then you use those numbers to generate your images.
A good idea is to write your prompt and fill in the values for CFG, steps, etc., then run it over and over in a batch until you find a seed value that makes a good image close to what you want. Then, use that seed and modify your prompt by adding or reducing weights, moving the parts around, adding or removing parts of the prompt, etc., until you get the image you want.
That's about all I can offer you. I'm sorry if that's not enough, but in that case, I'd suggest going back to the tutorials and reading those again. Another thing to do is find some images you like here on CivitAI or other sites like Majinai.Art, PixAI.art, etc., using the same prompt, negative prompt, settings, checkpoint, LoRAs, embeddings, etc., and try to get as close as you can to their image—or at least try to make a good image that's not the same but similar. When you copy someone's prompt and settings, you probably won't get an exact duplicate for a lot of reasons, but you should get something that you can be satisfied with.
I hope that helps.
@dita Many thanks :) i will get my hands on it :)
How do you make this prompt with Gradio and Fooocus?
Looking good
Looks great